
Views: 267 Author: 广宇大 Publish Time: 2026-10-22 Origin: Site


Content Menu
● What Is an Auto Sanding Machine?
>> Automated Sanding Versus Manual Sanding
● Main Types of Auto Sanding Machines
>> Wide-Belt Auto Sanding Machines
>> Automated Edge Sanding Systems
● Key Components That Affect Results
>> Abrasive Belts, Discs, and Sheets
>> Match Abrasives to the Substrate
>> Use a Progressive Grit Sequence
>> Consider Open-Coat and Anti-Loading Abrasives
>> Replace Abrasives Before Quality Declines
● Building a Repeatable Automated Sanding Process
>> Inspect Incoming Components
>> Establish the Starting Surface
>> Control Feed Speed and Pressure
>> Validate Robot Paths and Fixtures
>> Inspect After Each Critical Stage
● Common Sanding Problems and Solutions
>> Guard Moving Parts and Nip Points
>> Manage Fire and Explosion Risks
>> Use Appropriate Personal Protective Equipment
● Maintenance and Equipment Purchasing
>> Preventive Maintenance Priorities
>> Evaluate Real Production Capacity
>> Compare Total Ownership Cost
>> What Is an Auto Sanding Machine?
>> Can One Auto Sanding Machine Handle Every Material?
>> Is Automated Sanding Better Than Manual Sanding?
>> Why Is Dust Extraction Important for Auto Sanding Machines?
>> What Is the Best Grit Sequence?
>> Why Does an Auto Sanding Machine Leave Chatter Marks?
>> Is Respiratory Protection Always Required?
An auto sanding machine is automated sanding equipment that uses abrasive belts, pads, brushes, or robotic tooling to prepare surfaces with reduced manual handling. It can smooth rough material, remove machining marks, level panels, refine edges, prepare surfaces for finishing, or refine coatings between production stages.
Automated sanding is widely used in furniture, cabinet, flooring, door, panel, and metalworking production because it can improve repeatability and reduce operator fatigue. However, automation does not remove the need for process development. A poorly validated recipe can produce consistent defects at high speed.
This guide explains how auto sanding machines work, the main configurations, how to select abrasives, how to build a repeatable sanding process, and how to manage the dust, guarding, and maintenance requirements associated with automated production.
An auto sanding machine removes a controlled amount of material from a workpiece using abrasives and automated handling or feeding.
Its purpose may be to smooth rough timber, remove tool marks, calibrate panel thickness, prepare a surface for staining, or refine a coating before the next finishing operation. The required result determines the appropriate machine and abrasive.
Sanding cannot correct every upstream defect. Deep machining marks, dents, warping, or insufficient material thickness may require machining, repair, or rejection before sanding.
Manual sanding depends heavily on operator technique, pressure, and movement. Automated sanding uses controlled feed, programmed tool paths, or fixed machine settings to improve repeatability.
Automation can reduce variability when incoming material, fixtures, abrasives, and recipes are controlled. It can also reduce repetitive physical effort.
However, automation does not eliminate inspection. Surface quality, edge condition, and dimensional accuracy still require defined acceptance criteria and regular checks.
Wood, metal, plastic, composite, and coated surfaces respond differently to abrasives, heat, and pressure.
Solid timber can vary in grain direction, density, and moisture content. Veneered panels may have limited face-layer thickness. Sheet metal can distort under excessive pressure. Plastics and composites may melt or smear if heat is not controlled.
Always validate the sanding process on the actual substrate and construction rather than relying on a demonstration on unrelated material.
Wide-belt machines process broad panels using a wide abrasive belt. They are common in panel, furniture, cabinet, and flooring production because they can deliver consistent results across repeated workpieces.
These machines may perform calibration sanding, finish sanding, or both, depending on configuration. Feed speed, belt selection, contact pressure, and table height must be controlled.
OSHA notes that automatic feeding can reduce some hazards, but operators' hands may still be pulled into the sanding area or pinched between stock and in-running rolls if the feed system is not properly guarded. [2223]
Robotic sanding systems use programmable arms and abrasive tools to process components with complex shapes or repeated geometries.
They can follow controlled tool paths and apply consistent contact pressure when properly configured. Fixtures, vision systems, and part detection may be used to support repeatable handling.
Robotic sanding still requires process development. Tool path, abrasive wear, contact pressure, and part variation must be monitored.
Multi-head lines use several sanding heads in one pass. They can combine calibration, intermediate sanding, and finish sanding.
These machines can support high-volume production and complex surface requirements. They may use different abrasive types, contact rollers, pads, and belt speeds at each head.
Multi-head systems still require process validation. A poorly validated sequence can efficiently reproduce defects across an entire production batch.
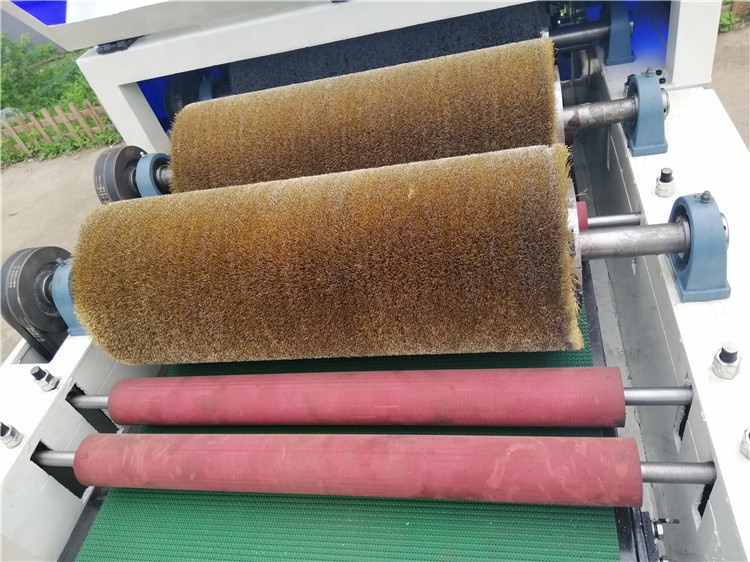
Brush sanding machines use wire, abrasive nylon, or nonwoven brushes to create texture or remove loose fibers.
They can emphasize grain, produce a distressed appearance, or prepare a surface for a rustic finish. The result depends on material species, brush construction, feed speed, and contact intensity.
Brushing is not simply aggressive sanding. Its purpose is controlled texture rather than uniform smoothness.
Automated edge sanding systems process component edges and profiles. They are useful for cabinet doors, drawer parts, shelving, furniture components, and shaped panels.
The abrasive belt or contact element must suit the edge geometry. A machine configured for straight edges may not handle curves, profiles, or narrow parts safely.
Use approved guides, fixtures, and work supports. Do not hold a narrow component by hand close to moving abrasive tooling.
The abrasive determines how quickly material is removed and what scratch pattern remains.
Grit size, abrasive grain type, backing stiffness, coating density, and anti-loading treatment all affect results. Coarser abrasives remove material more quickly but leave deeper scratches. Finer abrasives refine the surface but may not remove coarse defects efficiently.
Inspect abrasives before use. CCOHS advises replacing belts that are worn, frayed, or excessively worn in spots. [2230]
The contact element determines how pressure reaches the workpiece. A hard contact roller can support calibration, while a softer pad can suit finishing or selected contours.
A worn, damaged, or contaminated contact element can create inconsistent results even when the abrasive is new.
Inspect the contact system, not just the visible abrasive.
Conveyors, hold-down devices, and feed rolls maintain stable workpiece movement through the machine.
Uneven feeding can cause inconsistent removal, chatter, or visible surface variation. Short, thin, narrow, or slippery components may require approved carriers.
The machine's minimum workpiece dimensions are operating limits, not optional recommendations.
Dust extraction protects workers, keeps abrasive surfaces clear, and helps maintain consistent sanding performance.
OSHA identifies local exhaust ventilation as the primary method of controlling wood dust and recommends locating exhaust hoods close to the emission source. [2222]
For horizontal belt sanders, OSHA recommends enclosing the belt ends with exhaust hoods and adding a hood above the processing area for further control. [2222]
Modern auto sanding machines may use PLC controls to manage conveyor speed, abrasive pressure, table height, robot paths, alarms, and safety interlocks.
Recipe management helps reproduce approved settings for different products. However, a stored recipe must include material, abrasive, and tooling information as well as numerical settings.
Restrict changes to trained personnel and document any process adjustment.
Abrasives must suit the material, surface condition, coating, and machine speed.
A product suitable for solid timber may not be appropriate for veneered panels. Thin decorative surfaces require controlled removal to avoid exposing the substrate. Metal and composite surfaces may require different abrasive grain types and bonding systems.
Use supplier guidance and representative trials to establish the correct abrasive sequence.
A controlled sequence removes scratches from the previous stage. Skipping too far between grit sizes can leave coarse scratches beneath a finer-looking surface.
Clean the surface between stages where the process requires it. Residual dust can interfere with inspection and coating performance.
The correct final grit depends on the substrate, coating, and desired appearance rather than a universal rule.
Softwoods, resinous woods, painted surfaces, and some metals can load abrasives quickly. Open-coat or anti-loading products may help maintain cutting performance.
However, abrasive selection must still match the substrate and machine. A product that resists loading may not provide the required finish or removal rate.
Track abrasive life and replacement intervals rather than relying only on visual appearance.
A worn abrasive can burn wood, smear coatings, or create inconsistent removal.
Establish replacement criteria based on surface quality, machine load, feed rate, and abrasive condition. Do not continue using a belt or disc simply because it has not broken.
Keep spare abrasives available for critical production equipment, especially where long lead times could interrupt output.
Check the workpiece for machining defects, moisture problems, contamination, loose material, damaged edges, and insufficient thickness allowance.
Confirm that the component fits within the machine's handling limits. Material that cannot feed securely should not enter routine production.
Establish incoming inspection criteria and quarantine materials that fail them.
The starting surface determines the first abrasive stage. A rough sawn board may require a different approach from a machined panel with light tool marks.
Avoid starting too fine if coarse defects remain. The machine cannot efficiently remove a deep scratch using only a fine abrasive.
Record the starting condition because it forms part of the process specification.
Feed speed and pressure determine how much material is removed and how the surface looks.
Too much pressure can burn wood, load the abrasive, or remove excessive material. Too little pressure can produce inconsistent results.
The correct settings are the minimum that produce stable cutting within the validated process.
For robotic systems, validate the tool path, fixture location, contact pressure, and abrasive orientation using representative components.
A robot can efficiently reproduce an unsuitable path just as easily as a good one. Include part variation and fixture repeatability in the validation.
Inspect components after path changes and abrasive replacements.
Inspect surface appearance, scratch pattern, edges, and dimensional features where relevant.
Use consistent lighting and a reference sample. A surface may appear acceptable under diffuse workshop light but reveal defects under directional lighting.
Define acceptance criteria before production begins rather than relying on individual operator judgment.
Chatter marks appear as repeated surface waves. They can result from machine vibration, worn bearings, unbalanced rollers, loose components, or improper feed.
Check machine condition, belt tension, roller balance, and workpiece support before changing abrasive grit.
A new abrasive will not correct a mechanical vibration problem.
Burns and glazing can result from excessive pressure, dull abrasives, excessive feed resistance, or unsuitable abrasive selection.
Reduce pressure or feed resistance, replace worn abrasives, and verify that the abrasive is appropriate for the material.
Do not continue sanding a burned surface without addressing the cause.
Uneven removal can result from inconsistent pressure, poor support, worn tooling, or variation in the incoming surface.
Check machine condition, workpiece support, and abrasive wear before changing the entire process.
For automated systems, verify fixtures, feed paths, and consumable condition.
Cross-grain scratches can result from abrasive contamination, wrong sanding direction, or an incomplete grit sequence.
Inspect the abrasive and clean the surface between stages. Use a controlled progression and maintain consistent sanding direction where the finish requires it.
A fine abrasive cannot reliably remove every coarse cross-grain scratch.
Edges can round when they receive more pressure or contact than flat surfaces.
Review machine setup, abrasive type, feed orientation, and workpiece support. Use approved guides or fixtures where necessary.
Do not attempt to correct a dangerous edge-catching condition by holding the part more tightly near moving tooling.
Auto sanding machines contain rotating drums, belts, discs, rollers, and drive components that can catch hands, clothing, or jewelry.
OSHA states that machine guarding protects operators and nearby employees from hazards created by ingoing nip points, rotating parts, flying chips, and sparks. [2283]
OSHA also notes that moving machine parts can cause severe workplace injuries, including crushed fingers or hands, amputations, burns, or blindness, and that any machine part, function, or process that may cause injury must be safeguarded. [2284]
Keep guards in place and correctly adjusted. Do not bypass interlocks or remove guards to improve access or recover production time.
Wood dust can irritate airways and create workplace health risks. Effective source capture is the primary engineering control.
OSHA recommends local exhaust ventilation that removes dust at or near its source, with hoods positioned close to the machine or emission point. [2222]
Oregon OSHA notes that wood dust can present health and safety hazards, including dermatitis, allergic respiratory reactions, fires, explosions, and slip or trip risks from dust on floors. It recommends local exhaust ventilation to capture and remove dust from woodworking equipment. [2258]
Wood dust can accumulate on floors, ledges, and equipment. Keep the work area clean and follow the facility's combustible-dust controls.
Do not allow dust to accumulate near motors, electrical components, or hot surfaces.
Use approved cleaning methods and avoid compressed air where it can disperse dust into the breathing zone.
Eye protection, hearing protection where required, and respiratory protection may be necessary depending on the material and exposure assessment.
PPE must match the hazard. A glove suitable for handling sharp material may be unsafe near rotating machinery if it creates an entanglement risk.
Follow the machine manufacturer's instructions and the workplace protection program.
Maintain abrasives, contact rollers, pads, conveyors, bearings, drives, filters, guards, safety devices, and robot components.
Inspect for wear on critical parts such as contact rollers, belts, bearings, and drive components. Keep critical spare parts for components with long lead times.
Include belts, sensors, seals, filters, robot tooling, and control-system backups in the maintenance strategy.
Advertised feed speed is not the same as accepted production output.
Include loading, unloading, inspection, abrasive changes, cleaning, and rework when assessing capacity. Test the actual product mix rather than only large, easy-to-handle boards.
Report accepted components per shift or accepted surface area per hour using clearly defined conditions.
Include installation, extraction, abrasives, maintenance, labor, training, spare parts, and rejected material.
A lower-priced machine may be expensive if it produces inconsistent finishes or requires frequent manual correction.
The best investment is the configuration that reliably meets the product specification at the required production volume.
An auto sanding machine is automated sanding equipment that uses abrasive belts, pads, brushes, or robotic tooling to prepare surfaces with reduced manual handling. It can smooth, level, texture, or prepare materials for finishing.
No. Wood, metal, plastic, composite, and coated surfaces require different abrasives, pressures, and feed settings. Always validate the process on the actual material and component.
It can improve repeatability and reduce manual effort when the incoming material, fixtures, abrasives, and recipes are controlled. However, it still requires inspection and process validation.
Sanding generates fine dust that can affect worker health and interfere with sanding performance. OSHA identifies local exhaust ventilation as the primary method of controlling wood dust and recommends locating hoods close to the source. [2222]
There is no universal sequence. Start with an abrasive that removes the existing defects efficiently, then progress through stages that remove the scratches from the previous stage. Validate the sequence on the actual substrate and coating.
Chatter marks can result from machine vibration, worn bearings, unbalanced rollers, loose components, improper feed, or incorrect robot paths. Inspect mechanical condition, fixtures, and workpiece support before changing abrasive grit.
Not necessarily, but it may be required depending on the material, process, exposure assessment, and workplace rules. Effective source capture and ventilation are primary controls; respiratory protection supplements them where required.


